Introduction
Email authentication has emerged as a crucial defense for businesses in the digital era, particularly in the face of escalating email fraud like phishing and spoofing. This guide is designed to equip you with the knowledge and tools to implement email authentication effectively, safeguarding your business in 2024. By the end of this article, you will have a clear understanding of various email authentication protocols and how to deploy them to protect your business.
1. What is Email Authentication?
Definition and Purpose:
Email authentication is a collection of techniques used to verify the authenticity of an email message by confirming the sender’s identity. This process ensures that emails come from legitimate sources and are not tampered with during transmission. The primary goal of email authentication is to prevent unauthorized use of an email domain, commonly known as email spoofing.

Importance in Preventing Email Fraud:
Email fraud, including phishing and spoofing, threatens businesses significantly. Phishing attacks often deceive recipients into revealing sensitive information, while spoofing can tarnish a brand’s reputation by associating it with fraudulent activities. Email authentication is not just crucial; it’s necessary to mitigate these risks, making it more challenging for attackers to send malicious emails from your domain. The urgency of this need cannot be overstated.
Benefits for Businesses:
- Authenticated emails enjoy improved deliverability, as they are more likely to reach the recipient’s inbox than be flagged as spam. This not only enhances the effectiveness of your communication but also saves time and resources.
- Brand Trust: Customers are likelier to trust and engage with verified and secure emails.
- Security: Reduces the risk of phishing and spoofing attacks, protecting the business and its customers from potential harm.
2. Key Email Authentication Protocols in 2024
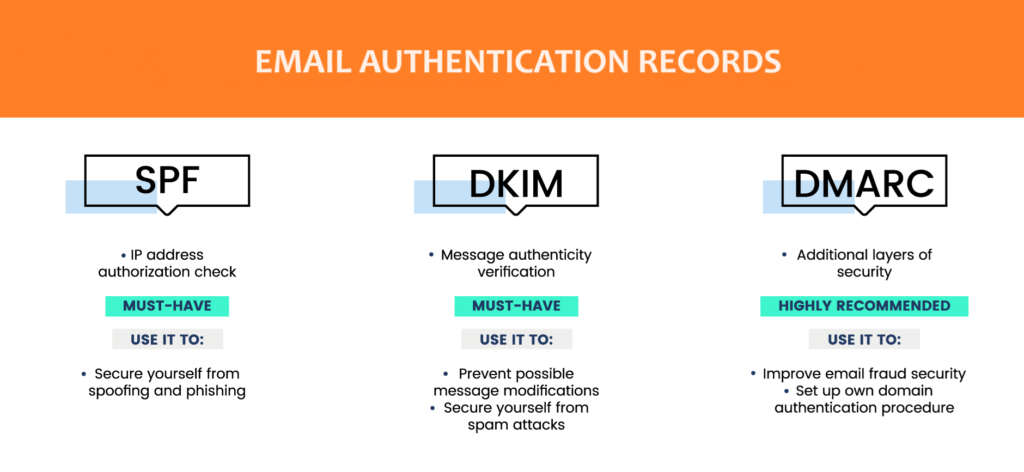
SPF (Sender Policy Framework):
- What it is and How it Works: SPF is an email validation system that detects and blocks email spoofing. It allows domain owners to specify which mail servers can send an email on behalf of their domain. When an email is received, the recipient’s mail server checks the SPF record to verify if the sending server is authorized.
- Steps to Implement SPF: Publish an SPF record in your domain’s DNS settings, listing all the IP addresses allowed to send emails to your domain. Ensure the record is correctly formatted and tested for proper functionality.
DKIM (DomainKeys Identified Mail):
- Explanation and Benefits: DKIM adds a digital signature to emails, which are encrypted using a private key. The recipient’s server uses the corresponding public key, published in the domain’s DNS record, to decrypt and verify the signature. This process ensures that the email has not been altered during transmission and confirms the sender’s identity.
- How to Set Up DKIM: Generate a DKIM key pair (public and private keys) and add the public key to your DNS record. Configure your email server to sign outgoing emails with the private key.
DMARC (Domain-based Message Authentication, Reporting, and Conformance):
- Overview and Importance: DMARC builds on SPF and DKIM by adding a reporting function and specifying how the recipient’s server should handle emails that fail authentication. DMARC policies can instruct the server to reject, quarantine, or take no action on these emails.
- Implementation Guide: Create a DMARC policy by publishing a DMARC record in your DNS settings. This record should include the desired policy (none, quarantine, reject), the percentage of emails to apply the policy, and an email address for receiving reports on failed authentication attempts.
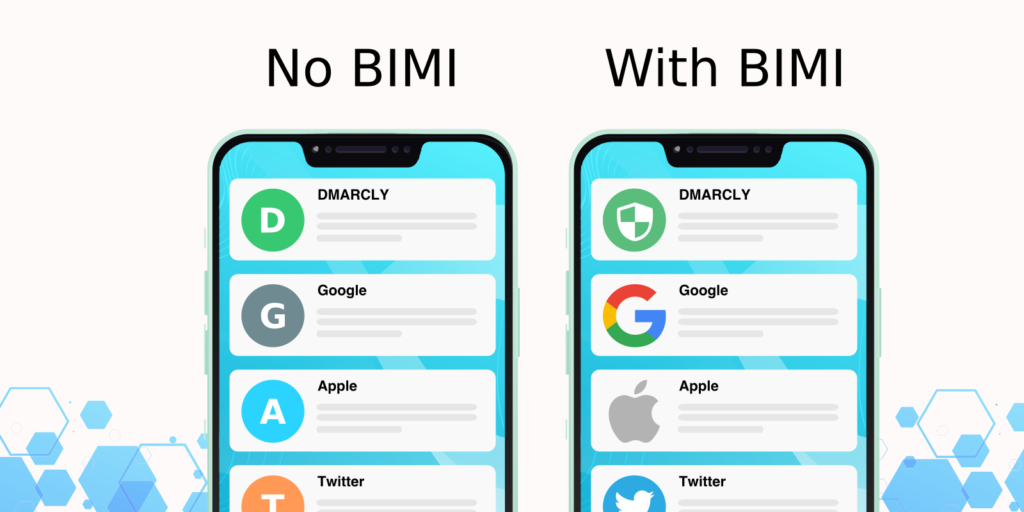
BIMI (Brand Indicators for Message Identification):
- What BIMI is and Why it Matters: BIMI allows brands to display their logo in email to clients who support the protocol. This visual cue helps recipients quickly identify legitimate emails and enhances brand recognition.

Once SPF, DKIM, and DMARC are correctly configured, you can set up BIMI. This involves creating a BIMI record in your DNS settings, including your brand logo’s URL. You’ll need to obtain a Verified Mark Certificate (VMC) to verify your logo and brand identity.
3. How to check your email authentication and configuration in Outbase?
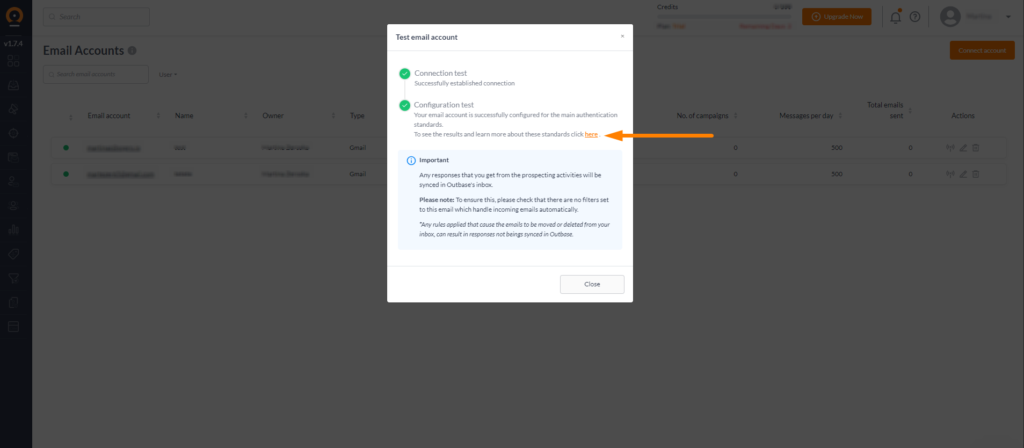
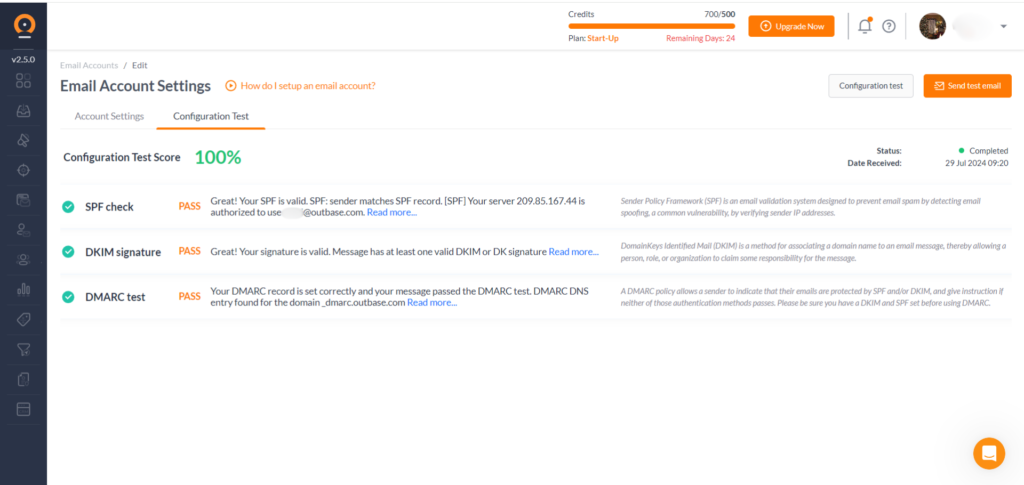
Once you’ve successfully linked your email account with Outbase, the system initiates a comprehensive configuration test. This test meticulously examines your domain, verifying the presence of SPF, DMARC, and DKIM records.
In the event of a test failure, rest assured that your email account is still connected to Outbase. The failure simply indicates the absence of one or more critical authentication records.
It’s important to understand that a configuration test failure does not mean your email account isn’t connected to Outbase.
Instead, it indicates that the system has found some critical authentication records missing.
The test will be marked as unsuccessful if even one of the three primary authentication records (SPF, DMARC, or DKIM) is absent.
To determine which specific authentication record is missing, review the results by:
- Clicking on the link within the pop-up window (displayed above) or

- Navigate to the Email Accounts Settings section in Outbase and select the Configuration Test tab.

In case the configuration test shows that specific record is not set up at all, or not set up properly, please review our additional guidelines for SPF, DKIM, and DMARC. Additionally, you can find specific setup links to different hosting providers in the next section.
You must have the authority to add/update domain’s records. If you do not, contact the owner of the IP address. For example, the IP address’s data center or your service provider.
4. Setting Up Email Authentication Records with Top Hosting Providers
Google Domains:
- Step-by-Step Guide: Log into your Google Domains account, navigate to the DNS settings, and add SPF, DKIM, and DMARC records as specified by Google. Ensure that each record is correctly formatted and saved.
GoDaddy:
- Instructions for Configuring Email Authentication Records: Access the DNS management panel in your GoDaddy account. Following GoDaddy’s guidelines, add the necessary SPF, DKIM, and DMARC records. Double-check that the records are correctly entered and propagated.
A2 Hosting:
- Detailed Steps: Refer to A2 Hosting’s support documentation for adding DNS records. Follow their instructions to configure SPF, DKIM, and DMARC records in your domain’s DNS settings. Ensure that each record is validated and working correctly.
SiteGround:
- How to Set Up Email Authentication Records: Log in to your SiteGround account, go to the Site Tools for your domain, and navigate to the DNS Zone Editor. Add SPF, DKIM, and DMARC records according to SiteGround’s guidelines. Verify that you have configured the records correctly.
Bluehost:
- Instructions for Adding Email Authentication Records: Log in to your Bluehost account, go to the Domains section, and select your domain. Under the DNS Zone Editor, add the required SPF, DKIM, and DMARC records. Ensure that the records are correctly formatted and functioning.
HostGator:
- Setting Up SPF, DKIM, and DMARC: Log in to your HostGator account, access the DNS managementhttps://www.hostgator.com/help/article/using-dkim-with-third-party-dns section, and add the necessary records for SPF, DKIM, and DMARC. Follow HostGator’s detailed instructions to ensure proper configuration and validation.
DreamHost:
- Email Authentication Setup Guide: Access your DreamHost account, navigate to the Manage Domains section, and select your domain. Use the DNS settings to add SPF, DKIM, and DMARC records as specified by DreamHost. Confirm that you have set up the records correctly.
5. Common Challenges and Solutions
Troubleshooting Failed Authentication
- Ensure Correct DNS Settings: Verify that your DNS records are correctly formatted and propagated. Use Outbase configuration test to check the status of your SPF, DKIM, and DMARC records.
- Monitor Reports: Regularly review DMARC reports to identify and address issues with email authentication.
Handling Email Spoofing and Phishing Attempts
- Update Records Regularly: By ensuring that your DNS records are up to date and reflect any changes in your email-sending infrastructure, you can know that your email security is up to date. This regular update and maintenance provide a sense of control and security, contributing to your peace of mind.
- Educate Employees: Train your employees to recognize phishing attempts and follow best practices for email security.
Best Practices for Maintaining Email Authentication Records
- Regular Audits: Regularly check your email authentication records to ensure they are current and influential.
- Stay Informed: Keep up with the latest email authentication protocols and best practice developments.
6. The Benefits of Using Email Authentication Protocols
Enhanced Email Deliverability
Authenticated emails are more likely to reach the recipient’s inbox, improving your email campaign’s effectiveness.
Improved Brand Reputation and Trust
Customers are more likely to trust and engage with emails from authenticated sources, which can lead to better customer relationships and brand loyalty.
Protection Against Email Fraud
Email authentication protocols significantly reduce the risk of email-based attacks, protecting the business and its customers from potential harm.
7. Most Searched Topics Related to Email Authentication
How Does Email Authentication Work?
Email authentication verifies the sender’s identity using protocols like SPF, DKIM, and DMARC. These protocols ensure that authorized servers send emails and that no one tempers the emails during transmission.
What is Email Spoofing?
Email spoofing is a tactic attackers use to send emails that appear to come from a legitimate source. Somebody can use this for phishing attacks or spreading malware.
Should You Use All Email Authentication Protocols?
Yes, using SPF, DKIM, and DMARC together provides comprehensive protection against email fraud. Each protocol addresses different aspects of email security, working together to ensure the authenticity and integrity of your emails.
The Role of SSL Certificates in Email Authentication
SSL certificates help secure the connection between the email client and server, adding an extra layer of security. If you have SSL certificates in place, all your emails will be transmitted over secure channels, even though it is not directly related to email authentication.
8. Future Trends in Email Authentication
Emerging Technologies and Protocols
New technologies and protocols are continually being developed to enhance email security. You should monitor emerging trends and always be on alert to adopt new measures as they become available.
Predictions for the Future of Email Security
As email fraud techniques evolve, so will email authentication protocols. Future developments may include tighter integration between email authentication and other security measures, such as artificial intelligence and machine learning.
Conclusion
Email authentication is essential for protecting your business’s email communications. Implementing and maintaining these protocols can enhance security, improve deliverability, and build customer trust. Secure your email communications today and stay ahead of potential threats. Therefore remember that email authentication is not a one-time setup but an ongoing process that requires regular monitoring and updates.


